How to Change the Author in WordPress (6 Easy Ways)

In this tutorial, I will show you how to change the author in WordPress.
Changing the author to another author in WordPress is an easy task that can be done in just a few clicks no matter which WordPress editor you are using – Gutenberg or Classic.
There are a number of different reasons why you would want to change the author of a WordPress post or even multiple posts, and there are several different ways to do it.
Whatever your reason is, in this tutorial, I share 6 easy ways to change, edit, and update the author of a post in WordPress. I’ll also explain when each method is best used.
First though …
Before you can change the author of a WordPress post, the ‘new author’ whom you want to assign posts to needs to have an existing user account on your WordPress website.
If they have an account already, great! 🙂 You can skip the next section and go straight to method #1. But if they don’t, you’ll need to add them.
Adding A New Author To WordPress
First, go to Users >> Add New. Then, fill out the required fields and choose Author from the Role drop-down menu. Click the Add User Button.

And that’s it! You have successfully added a new author account to your site and you are ready to follow the instructions in this tutorial. Now choose a method from the table of contents below that best fits your needs.
How to Change the Author of a WordPress Post
If you just want to change the author for one WordPress post, there are three quick and easy ways you can do that:
- Using the Quick Edit function
- Using the Gutenberg block editor
- Using the Classic editor
If you don’t already have the WordPress post editor open, the Quick Edit function is the fastest way to change the author of a single blog post, and it works whether you’re using the Gutenberg or the Classic editor – so we’ll start with this method first.
Then, I’ll show you how to change the author of a WordPress post using the Gutenberg block editor, and then the Classic editor. Let’s get started. 🙂
Changing the Author Using Quick Edit
From your WordPress dashboard go to Posts >> All Posts.
Hover over the Post Title for the post whose author you’d like to change and click the Quick Edit Link.

A new panel will open. All you have to do is choose a new Author from the dropdown menu. Click the Update button to apply your changes.

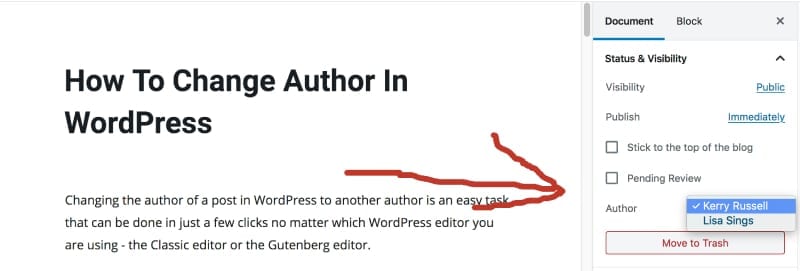
Changing the Author Using Gutenberg Editor
To change the author of a WordPress post using the Gutenberg block editor, first, go to Posts >> All Posts. On the post you want to change the author for, click the Edit Link to open up the post editor.
Then, in the right sidebar, go to Documents >> Status & Visibility and select your desired author from the Author dropdown menu. Click the Update Button to save your changes.
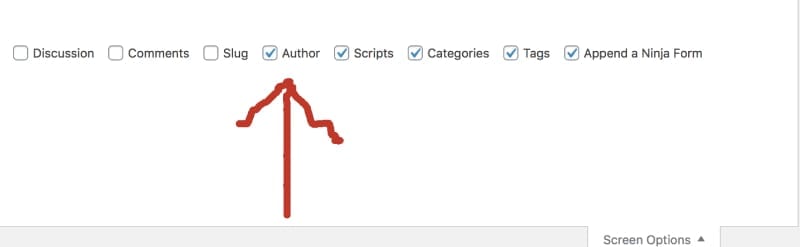
Changing the Author Using Classic Editor
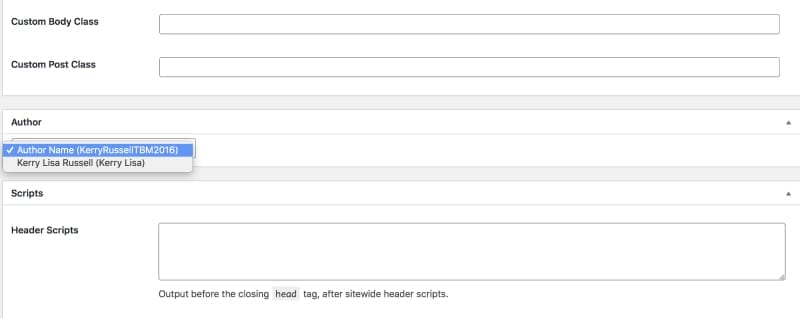
Go to Posts >> All Posts. For the post whose author you want to update click the Edit Link. On the next page, at the top of the page, open up Screen Options and select the Author checkbox.
Now, scroll down the page until you see a section titled Author. Open up the dropdown menu and select your desired Author.
And that’s it! Using one of the methods above you can quickly change the author of a WordPress post to another author.
Don’t forget to click the Update Button to save your changes!
Bulk Change the Author for Multiple Posts
If you need to change the author for more than one post in WordPress, I recommend you bulk edit the posts to save you time.
This method is similar to the quick edit function we used above to change the author for a single blog post, but there are a few small differences.
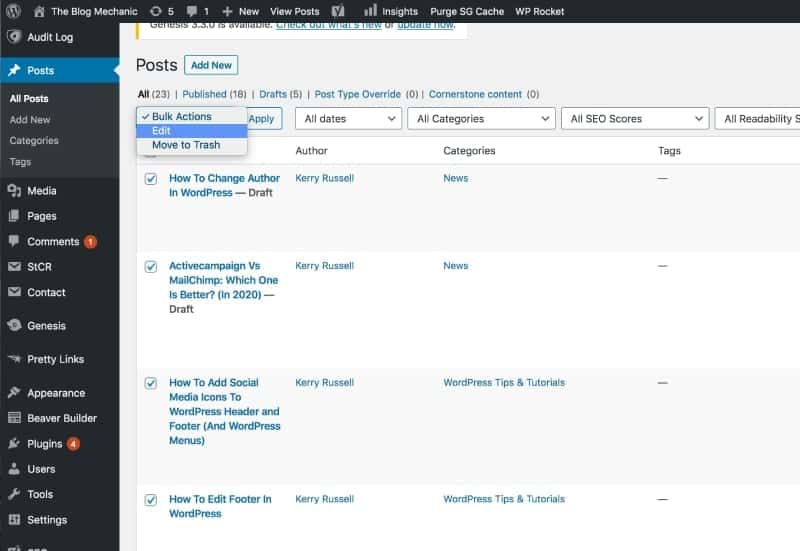
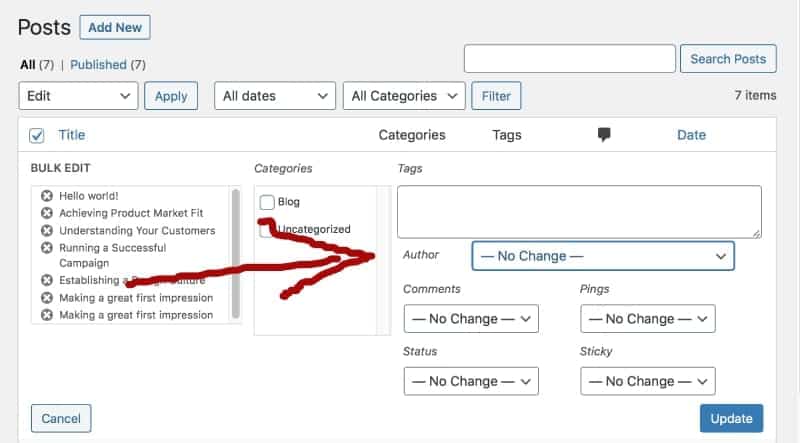
Go to Posts >> All Posts. But this time, before you click the edit link, by default WordPress only shows 20 posts per page. If you have a lot of posts to bulk change, you will need to increase that number.
To do this, on the all posts page open up the Screen Options panel located at the top of the WordPress dashboard and change the number of posts you want to display. Click the Apply Button.

With all your posts listed on one page, next Select The Posts whose author you want to change. Then, choose Edit from the Bulk Actions menu and click the Apply Button.
A new bulk edit options panel will appear. Choose the new Author you want to assign the posts to and click the Update Button.
And that’s all! As you can see, there’s no need to waste time changing the author for each post one by one. Using this method you can make the change in seconds.
Hide or Remove Author From WordPress Posts
If you have multiple authors publishing content on your website, but you want all content on the site to be associated with your brand and not individual writers, you may decide to not show the author name on posts.
You can hide the author name using CSS code or you can remove it completely by deleteing the author metadata from your theme files …
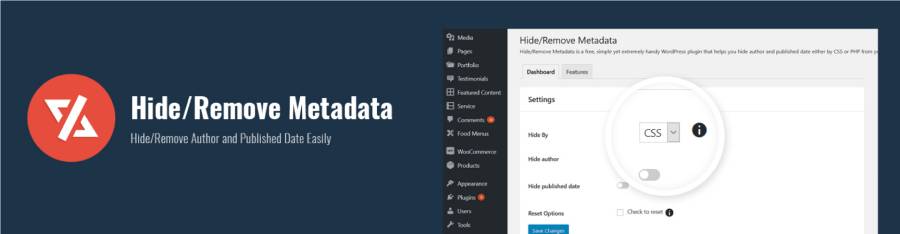
But each WordPress theme is different so there are no ‘one size fits all’ instructions to do either of those things. Instead, I recommend you use a WordPress plugin called Hide/Remove Metadata.
First, install and activate the plugin. I’ve already published a tutorial that shows you how to install a WordPress plugin, so I won’t repeat it again. Visit that link for instructions.
Once activated a new tab named Hide/Remove Metadata will be added to the bottom of the left side navigation menu inside the WordPress admin area. Click It to go to the plugin settings.
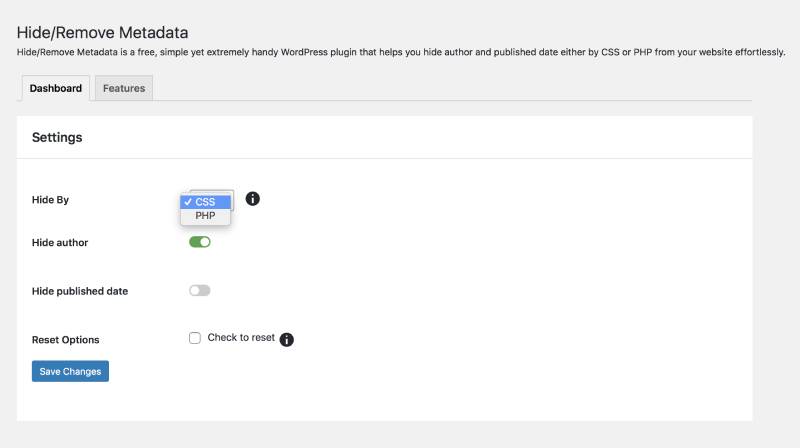
On the settings page, choose CSS or PHP. Choosing CSS will hide the author name and PHP will remove it completely from your theme files.
Once you’ve made your selection, activate the Hide Author option and click the Save Changes Button.
Now when you go visit the frontend of your website, the author’s name will no longer be seen on posts …
But in the rare instance that the plugin doesn’t work with your active WordPress theme, try using the WP Meta and Data Remover plugin instead.
Delete a User Account and Assign Their Posts to Another Author
There may be a time when you need to delete a user account on your WordPress website and assign all posts made by that user to someone else.
In my experience, there are two circumstances where you’d want to do this:
- You have a team of people writing for you and one of them leaves.
- Your WordPress admin username is still set to the default ‘admin’ which leaves your site wide open to hackers.
While the second circumstance sounds like a rarely-needed task, it happens a lot more than you might think …
And by default you can’t change your WordPress username, so you have to create a new admin account instead and delete the default one.
Once the default ‘admin’ account is deleted, you can then assign all your content to the new account you create.
Note: Only site admins can delete user accounts!
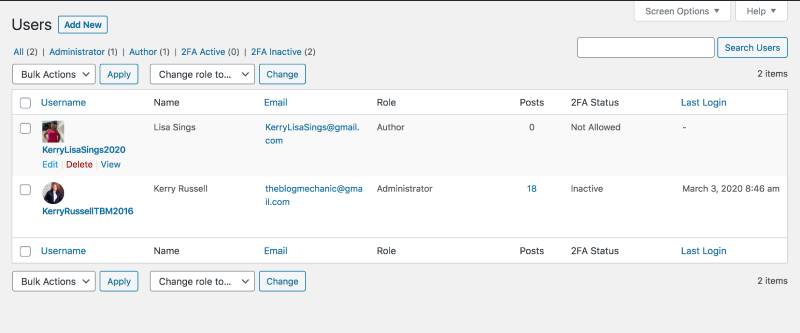
To delete a user account and assign all posts made by the user to someone else, go to Users >> All Users. Click Delete for the account you are removing.

On the next page, select Attribute all Content to and make your choice of Author from the drop-down menu. Click Confirm Deletion.
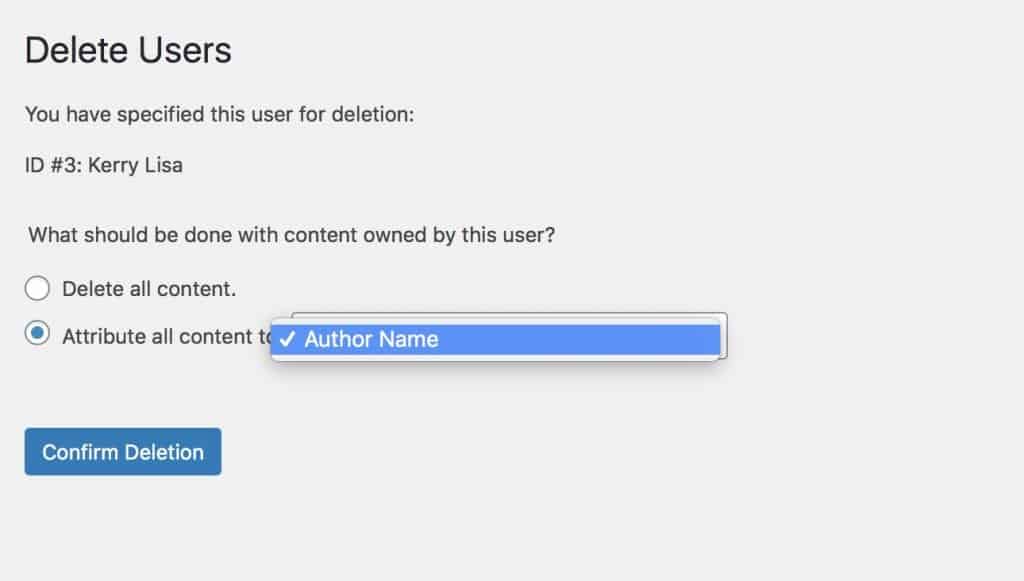
When the user account is deleted, all content published by the deleted author will be assigned to the new author you selected.
How to Change Author Name in WordPress
In some cases, you may just need to update the author name on WordPress posts – not change the author completely. For example …
- You want to show your real name on published posts, not your WordPress username.
- You want to use a pen name instead of your real name on posts.
- Another author on your site changes their legal name and now they want the name change shown on all their posts.
Whatever the reason, changing the display name of an author in WordPress is super simple, but you do need to be a WordPress admin to change it.
So … if you have other people writing for your site and they want their author name changing, you’ll have to change it for them. Here’s how you can do that.
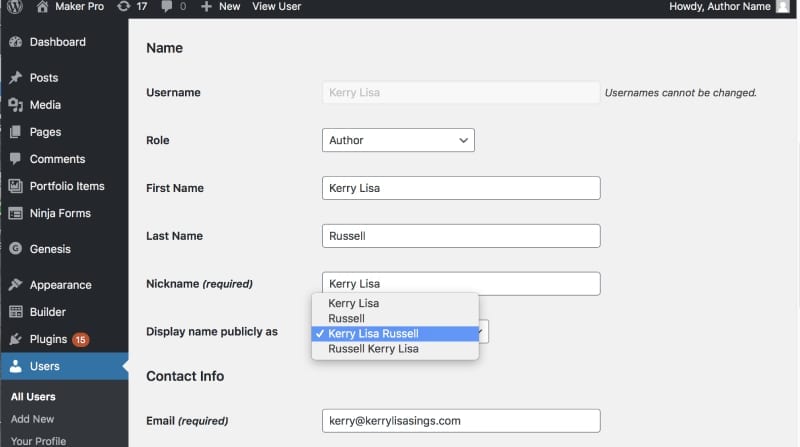
Go to Users >> All Users. On the next page, you’ll see a list of all user profiles. Click Edit under the user profile whose display name you want to change.
Next, scroll down to the Name section. Update the user’s First and Last Name. Then, make your selection from the Display Name Publicly As drop-down menu and choose the name the author wants to use.
Now click the Update User Button to apply and save your changes.
And that’s it! Upon completion, all posts published by the author whose profile you’ve just updated will be changed to show the new display name.
But there’s one more optional step you might want to take …
Change the Author Archive Page Url In WordPress
By default, WordPress uses your username in the URL of your author archive page, but you might want the URL to include your author name instead.
For example: if my WordPress username for this site is Kerry Lisa, then my author archive page will be at ‘theblogmechanic.com/author/kerry-lisa‘
But if my author display name is The Blog Mechanic, then I might want my author archive page URL to be ‘theblogmechanic.com/author/the-blog-mechanic‘ instead.
To change the author archive URL you can use a plugin called Edit Author Slug.
To get started, install and activate the plugin. See my tutorial how to install a WordPress plugin for more information.
Once activated, go to Users >> Your Profile and scroll down until you see the Edit Author Slug settings. Select Custom and enter the ‘slug’ you want to show at the end of your archive page URL.
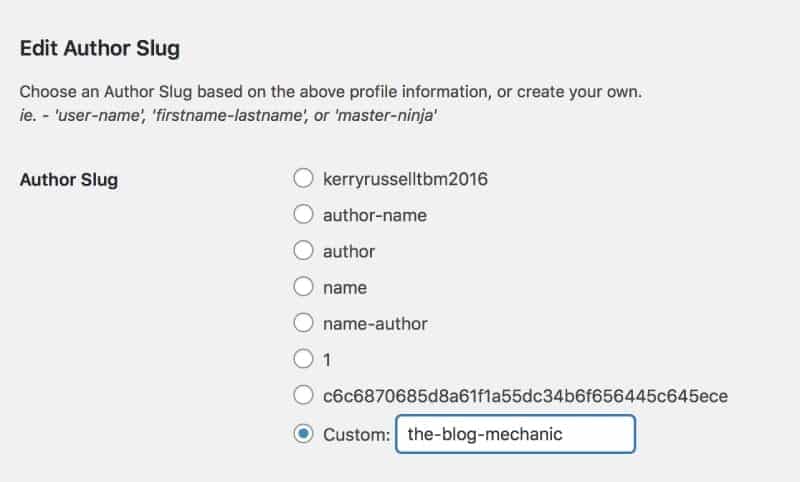
Don’t forget to click the Update Profile Button at the bottom of the page to save your changes.
Important note: if you choose to change the author archive page url to match your author display name, you’ll need to redirect the old url to the new one. You can use this plugin to help with that.
Conclusion
There are a number of different reasons why you’d want to change the author in WordPress, and there are several different ways to do it.
To help you find the best method for your circumstances, in this article I have shared 6 easy ways to change, edit, and update the author in WordPress.
Just pick the method that best describes what you are wanting to achieve and follow the step-by-step instructions in this article. The options are:
- Change the author for a WordPress post
- Change the author for multiple posts
- Remove or hide the author name on WordPress Posts
- Delete an author and assign their posts to another
- Update an author’s display name on posts
- Change an author’s archive page URL
I hope this tutorial has helped you learn how to change the author in WordPress. I’d love to know which method worked for you, or if you know of any additional ways to do it. Let me know in the comments box below.