WP Rocket Review (+ Demo)
Did you know that website speed is now a top Google ranking factor and that 40% of website visitors won’t wait longer than a few seconds for a site to load?
So if you want:
- Your content to be found on page #1 of Google
- More traffic, subscribers, and more sales
- Your WordPress website needs to load FAST on mobile and desktop.
Your WordPress website needs to load FAST on mobile and desktop.
And guess what?
You don’t have to hire someone to speed up your website for you.
Not anymore!
You can use a plugin called WP Rocket instead.
It is:
- Easy to use
- Affordable
- Quick to setup
In this WP Rocket review, to demonstrate what kind of results you can expect from WP Rocket, I am using an unoptimized copy of my website as a case study.
I will show you how WP Rocket works and how to correctly configure it on your own wp site for optimal website speed.
By the way, the links above are affiliate links. That means I will get a small commission if you do end up purchasing. It’s at no extra cost to you, and please if you have any questions about the plugin, let me know. I’d be happy to answer them for you.
Let’s get started 🙂
What Is WP Rocket?
WP Rocket is a premium caching plugin that will improve the load time and performance scores of your WordPress website in just a few clicks.
It has a reputation for being the most powerful caching plugin ever created by WordPress experts. But in my experience, that’s not entirely true because…
WP Rocket is SO much more than just a caching plugin!
It is a complete set of website optimization tools that helps you easily fix known causes of website slowdown.
Including:
- Eliminate render-blocking resources
- Make fewer HTTP requests
- Leverage browser caching
- Defer offscreen images
- Minify & combine files (inc Google Fonts)
- Defer parsing of javascript
- Enable G-Zip Compression
- And more …
I started using WP Rocket to speed up my own WordPress website and wp sites belonging to clients that I work with in 2019.
Prior to that, I used a combination of several free WordPress plugins which works too. But it takes much longer to do.
Switching to WP Rocket has saved me A LOT of time.
You can have the plugin installed and working for you in 15 minutes or less, and I’ll show you how in this review.
Does WP Rocket Work?
To answer that question, I will show you what a difference WP Rocket made to the unoptimized copy of my own WordPress website.
Take a look at the before and after screenshots below.
I used GTmetrix to test the load time and performance scores of the site.
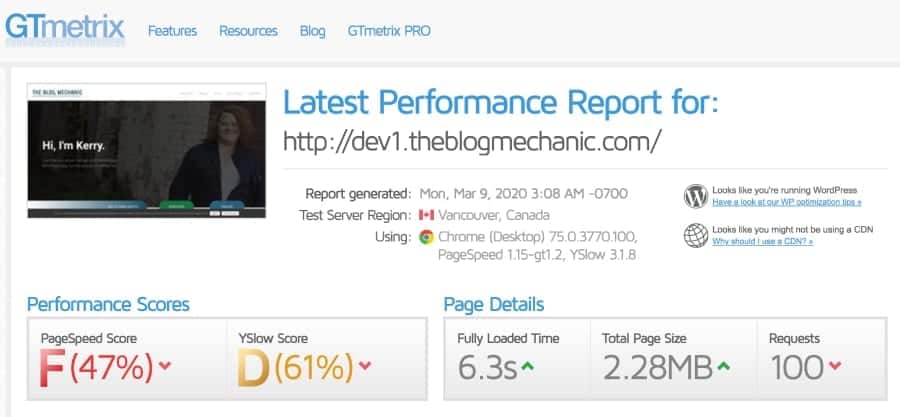
As you can see the results are not good!
A total load time of 6.3 seconds and an F PageSpeed score. (yuk!)
Most people won’t wait longer than 3 seconds for a website to load. They will just close the page and move on to the next website.
And with a PageSpeed score of just 47%, it’s unlikely that Google will reward the site with increased search rankings anytime soon.
Here’s what happened after I installed and configured WP Rocket settings.
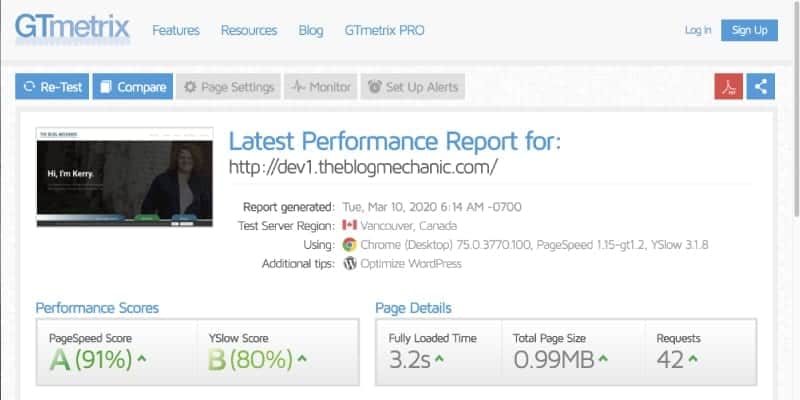
BOOM!
The site now loads 3.1 seconds faster.
And PageSpeed score jumped from a Grade F to a Grade A
But that’s not all!
The Yslow Score given by Yahoo also jumped from a grade D to a grade B.
AND
Number of HTTPS requests went down from 100 to 42. Plus, the total page size went from 2.28 to 0.99 megabytes.
Click here to try WP Rocket today. You have nothing to lose and a lot to gain since WP Rocket also offers a 100% 14 day satisfaction guarantee, during which time you can ask for a full refund with no questions asked.
How to Speed Up Your Website
Now you know what kind of results you can expect from WP Rocket, I will show you how to use the plugin to speed up your own WordPress website, step by step.
Getting Started
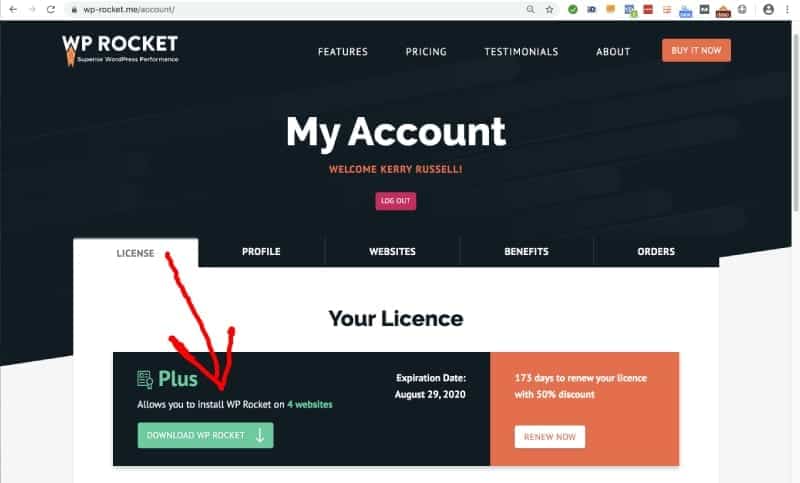
To get started, buy the plugin here.
After purchase, you’ll be given a link to download the plugin zip file.
Or you can:
- Go to WP Rocket here
- Click the accounts tab to login
- Click the license tab
- Download the plugin
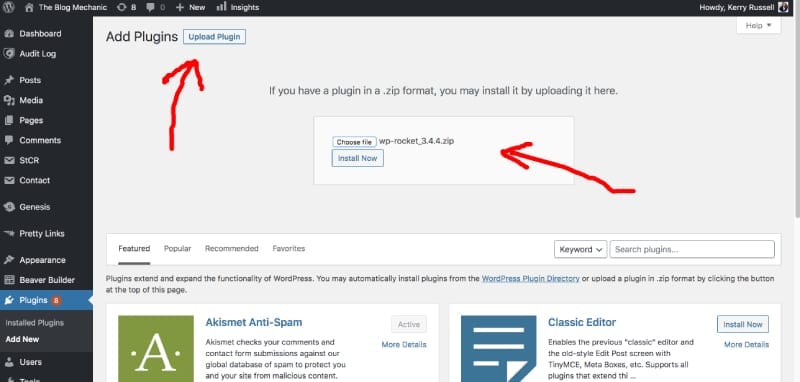
Next:
- Login to WordPress
- Go to Plugins >> Add New
- Upload the plugin
- Activate the plugin
Upon completion, go to Settings >> WP Rocket
You should now be on the WP Rocket dashboard where all the settings are for the plugin.
WP Rocket Settings
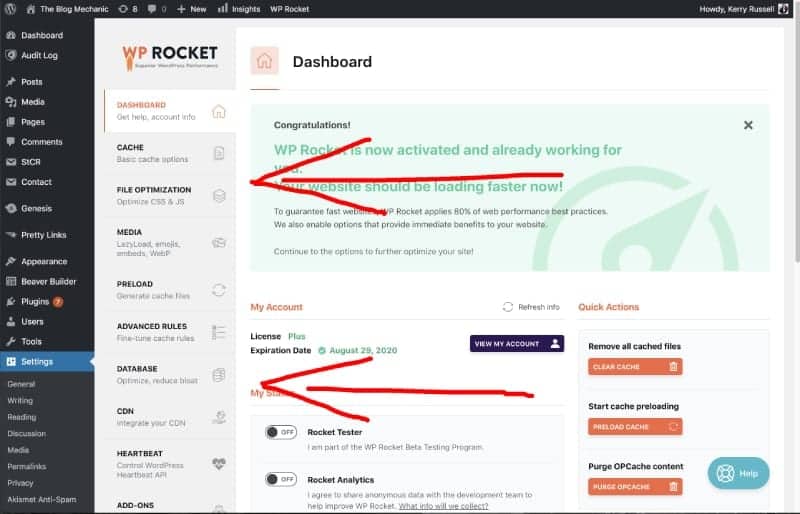
On the dashboard you’ll see a congratulations message letting you know that WP Rocket is activated and already working for you.
For most websites, the default settings that are applied when the plugin is activated won’t make a big difference to the performance of your website.
For optimal speed, you need to tweak the settings! Let’s go do that now. 🙂
Caching
By default page caching, browser caching, preload caching, and Gzip compression is automatically applied for you when WP Rocket is activated.
I won’t bore you with the ins and outs of how caching helps speed up your WordPress website. If you’d like to know more, see the links provided above.
On the cache tab, there are three optional settings:
- Cache for mobile devices
- User cache
- Cache Lifespan
I’ll talk you through each of the settings below.
Separate cache files for mobile devices
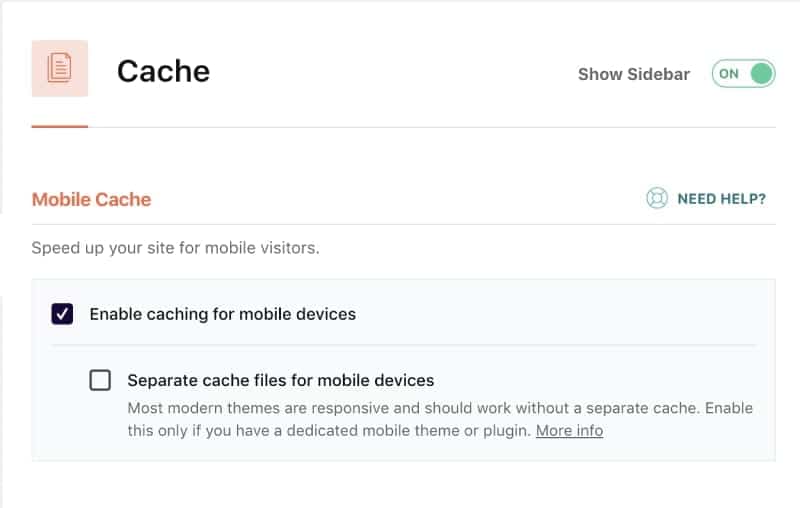
If your WordPress theme is not mobile responsive and you’re using a different theme for mobile visitors or a plugin like WPtouch, you should turn this option on.
You should also turn this option on if the mobile version of your site has features that the desktop version doesn’t, like additional navigation menus for example.
When you activate this option, WP Rocket creates a different cache file for mobile visitors only. Without it, mobile visitors could end up seeing the desktop version of your site, and vice versa.
User Cache
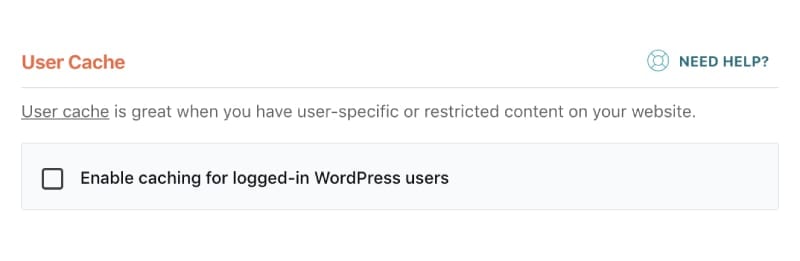
If people have to login to your site to access restricted content, or you have a WooCommerce shop, you’ll want to turn this option on.
When you enable it, WP Rocket creates dedicated cache files for each logged-in WordPress user, making sure they can see the right content.
Cache Lifespan
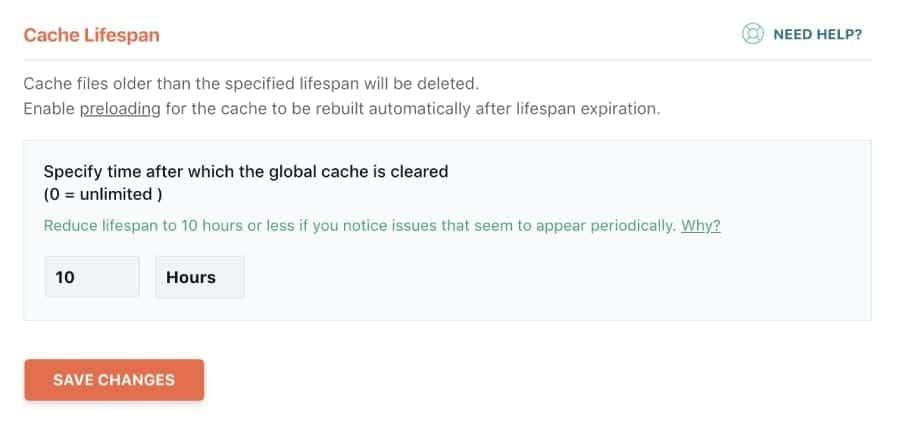
For most websites, the default settings of 10 hours will work just fine.
Cache lifespan is the number of hours that cached files stay cached for before WP Rocket automatically deletes and rebuilds the cache.
But if you have a very busy site with lots of registered WordPress users and comments …
And you update and add new content to your site several times throughout a typical day, then you might want to reduce the number of hours.
File Optimization
File optimization is my favourite WP Rocket plugin feature and here’s why.
If you’ve ever tested the performance of your Website with any of these tools:
- GTmetrix
- Google PageSpeed Insights
- Pingdom
You’ve likely seen the following recommendations for improvement:
- Eliminate render-blocking resources
- Make fewer HTTP requests
- Defer parsing of Javascript
Although worded differently, each of these suggestions basically mean the same thing.
You need to:
- Combine HTML, CSS, and JavaScript files into one
- Load the files in the footer of your site (not the header)
Sound complicated, doesn’t it?
And it is without the right tools!
But WP Rocket makes fixing these suggestions a lot easier than any other solution I have tried and tested.
That said, you still need to be careful with the file optimization settings because they can cause errors on some websites.
But don’t worry!
If anything breaks after activating these settings, all you have to do is deactivate them and your site will return back to normal again.
Minify and Combine HTML Files
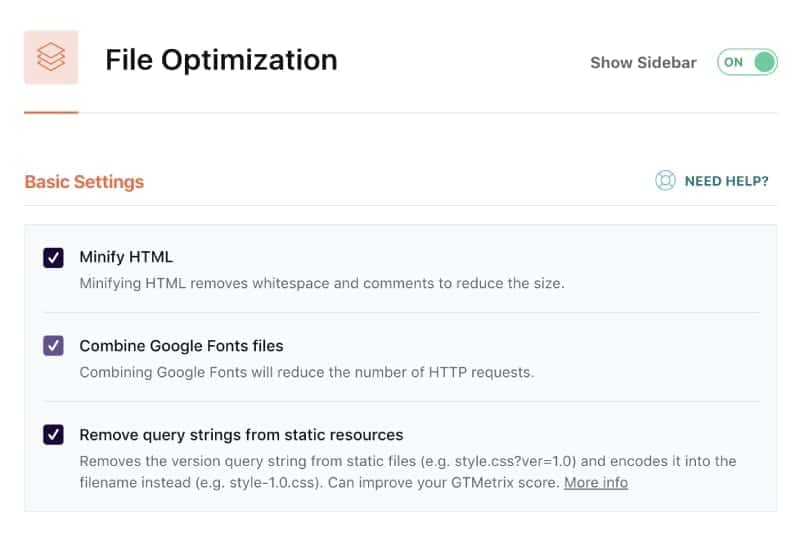
Activate:
- Minify HTML
- Combine Google fonts files
- Remove query strings from static resources
- Save your changes
- Clear the WP Rocket cache
Now, review your site to make sure nothing looks broken.
Most people won’t have any issues with the HTML settings. If you do, it will most likely be with the formatting of design elements on your WordPress theme.
If that happens to you, turn minify HTML off. Save your changes and review the site again. In my experience, that will fix any issues you may have.
Minify and Combine CSS Files
Minifying and combining CSS files is more likely to cause site errors than minifying and combining HTML files.
So this time, when you select the minify option, you’ll see a warning.
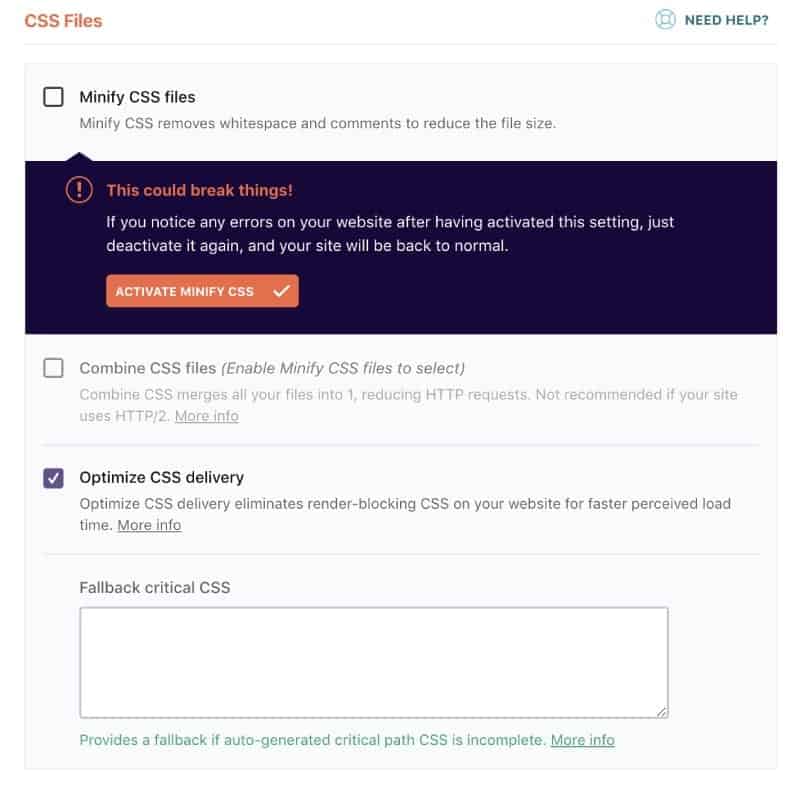
If you have a high traffic site and you’re worried it will break, you may want to test the changes first on a staging area.
I really don’t think that’s necessary though because like I said earlier, when you deactivate the settings your site will return back to normal again.
So:
- Activate all the CSS settings
- Save your changes
- Clear the WP Rocket cache
- Review your site
If something on the site is broken, don’t panic!
Deactivate ‘Combine CSS files’ and save your changes. Clear the WP Rocket cache. Then check the site again.
And if that doesn’t fix it, deactivate ‘Minify CSS Files’. Save your changes. Clear the cache and check the site.
Note: should any of these options results in site errors, that does not mean you cannot use WP Rocket to minify and combine CSS files. You just need to exclude the files that are being affected.
Minify and Combine and Defer JS Files

Minifying, combining, and deferring Javascript files will also cause more issues than minifying HTML (and CSS).
Again, if you have problems, you can deactivate the settings to revert your site back to normal. So don’t worry about it.
Go ahead and:
- Activate all JS settings
- Save your changes
- Clear the WP Rocket cache
- Review your website
After doing that, depending on which WordPress theme and plugins you are using, it’s likely that some site features may not work as expected.
In which case, deactivate ‘Load JavaScript Deferred’. Save your changes. Clear the WP Rocket cache and review your site to see if the issue(s) is resolved.
If not, you’ll need to repeat the above steps for all the other Javascript settings, one by one, starting from the bottom and working your way up.
Note: if any of these settings cause website errors, that does not mean you cannot use WP Rocket to minify, combine, and defer JavaScript files. You just need to exclude the right files from optimization.
Lazy Load Images and Videos
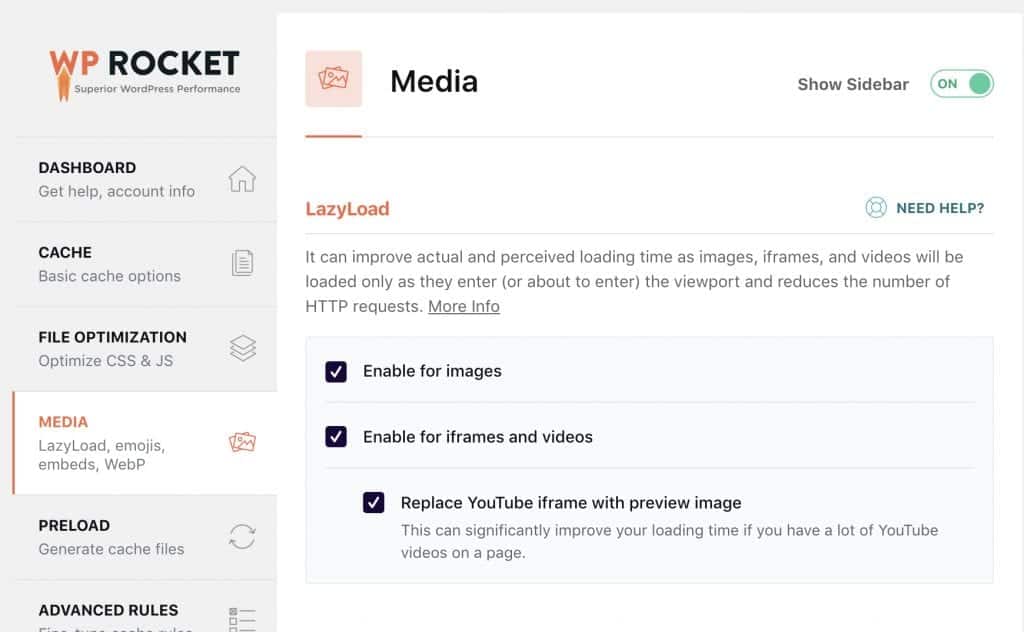
Images slow down page load time because the browser has to download all the image files before it can fully load the webpage.
To speed things up, you can use WP Rocket to lazy load images.
When you apply lazy load, the browser doesn’t have to download all the images at once. It downloads them as the user scrolls the page.
And if you have a lot of YouTube videos within your content, you can use WP Rocket’s media settings to replace YouTube iframes with preview images.
That way the video is only loaded by the browser when a user clicks the play button. This reduces https requests and makes your page load even faster.
On the media tab:
- Activate all the lazy load options
- Save your changes
- Clear the WP Rocket cache
- Review your site to see lazy load in action
Also on the media tab, to reduce the number of https requests some more …
You should:
- Disable Emoji’s
- Disable WordPress Embeds
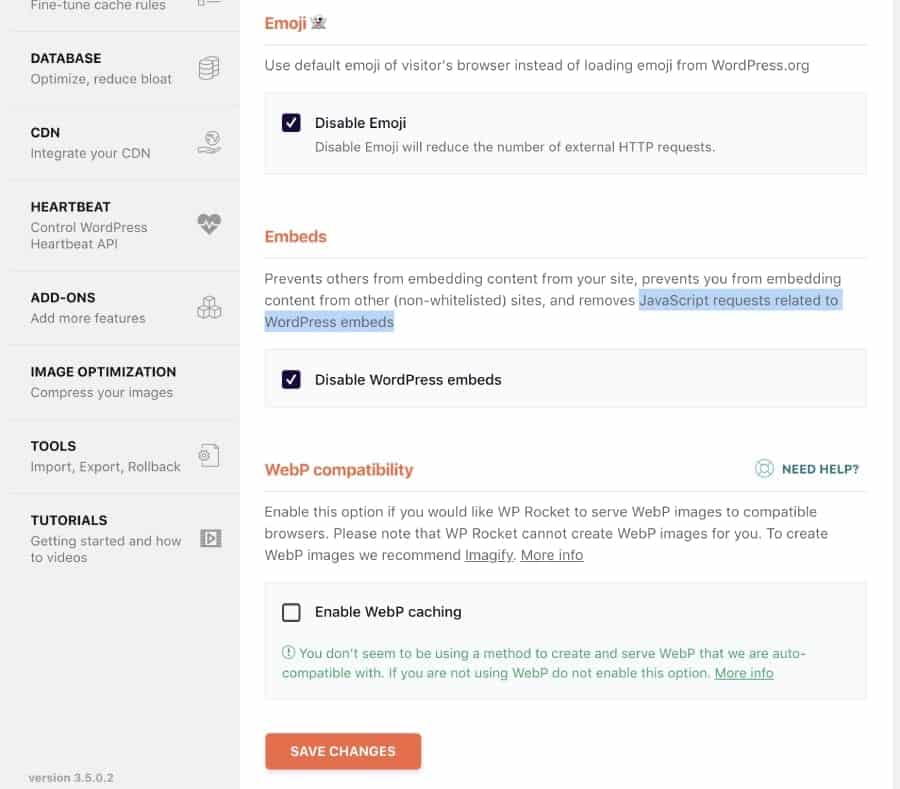
And, if you’re using a plugin like WebP Express to serve WebP images which is not always possible on some servers, select that option too.
Note: on some websites that have an image logo, enabling lazy load can cause your site header to flash when navigating between pages. Should that happen to you, exclude your logo from lazy loading.
Cache Preloading
By default, when you first activate WP Rocket, the plugin starts crawling your site and preloading a cached copy of your content which is a great start …
But the plugin can only preload cached copies of the content that it finds by following links on your homepage.
The problem?
You might not link to all pages and posts from your homepage, so some pages and posts may be missed until they are requested by a user.
To help WP Rocket quickly find and preload a cache for every single page and post on your site, you can tell it to use your XML sitemap.
Active ‘sitemap-based cache preloading’.
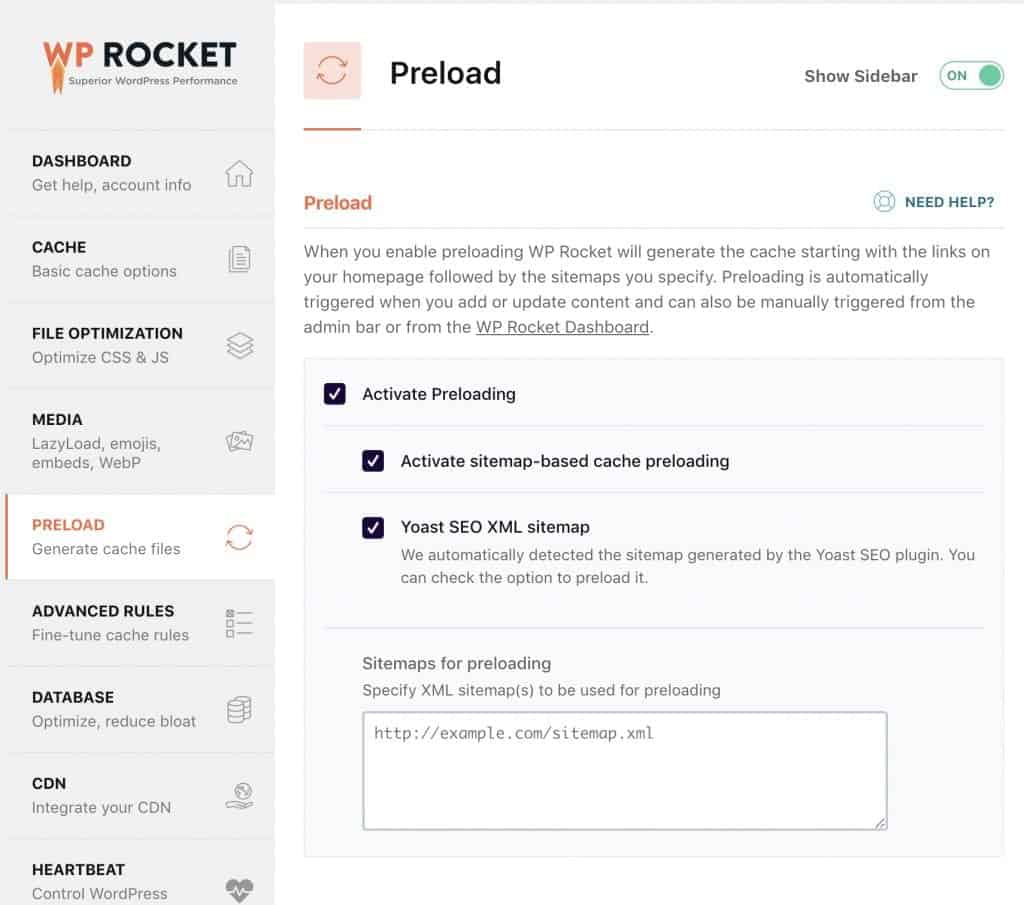
WP Rocket automatically detects sitemaps generated by popular SEO plugins like Yoast SEO, All in One SEO Pack, and SEOPress.
If your sitemap is not automatically detected, you can manually add the URL.
Advanced Caching Rules

For most websites, the default cache settings will work just fine.
But if you have a complex site, there may be some pages that you’ll never want to cache, like registration and custom login and logout pages.
Add the URLs of any pages you never want to cache.
Database Optimization
A large database can slow down your site because it takes longer for the server to find the information it needs from the WordPress database tables.
By removing data that is no longer needed from the database tables, the server can find the information it needs much quicker.
As a result, your website will load faster.
Select all options on the database tab EXCEPT one …
DO NOT SELECT AUTO DRAFTS
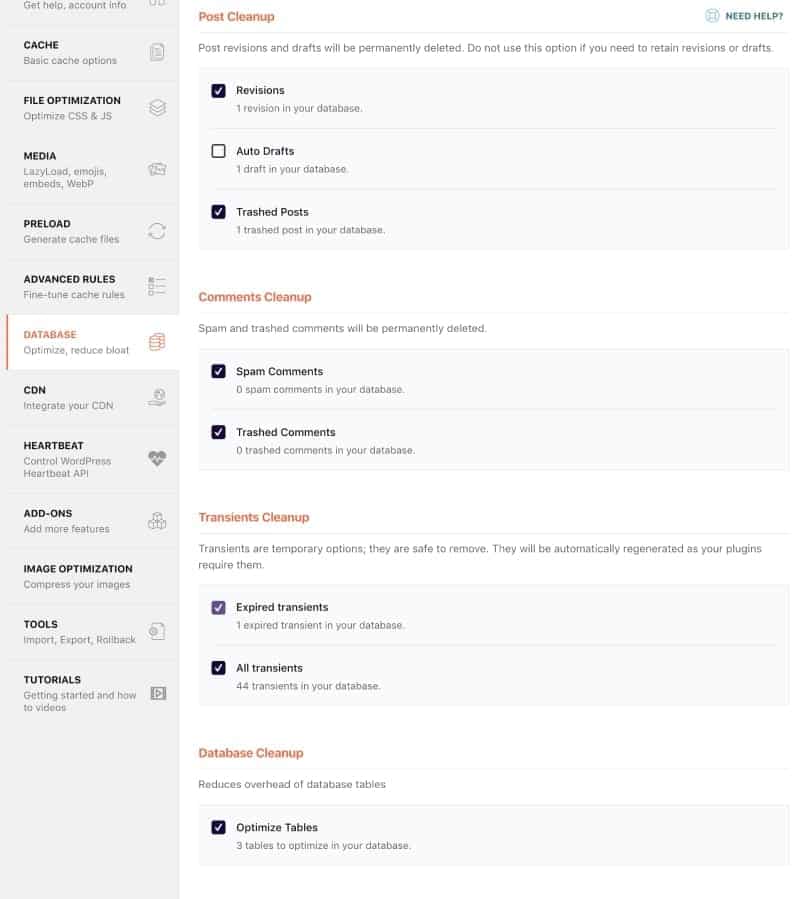
Now scroll down and click the ‘optimize’ button.
After that, you can schedule automatic database cleanups to run daily, weekly, or monthly.

Note: changes to your database cannot be undone. Whether you use WP Rocket or another plugin to cleanup your database – ALWAYS backup your website first.
Self Host Google Analytic and Facebook Pixel Scripts
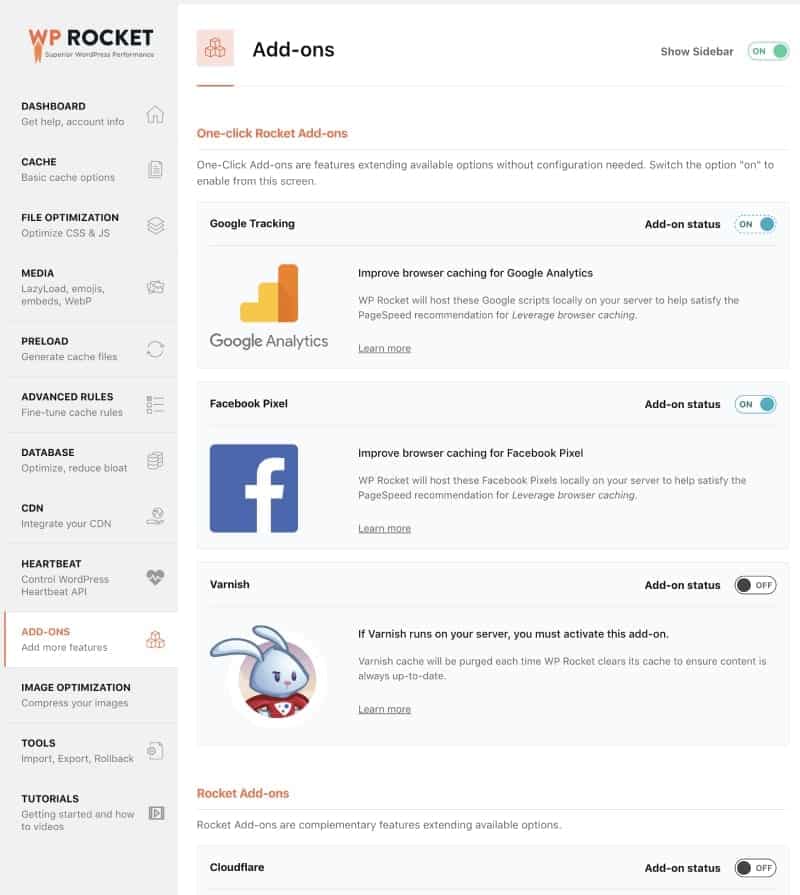
When you test the performance of your website with tools like GTmetrix and Pingdom, you will see a suggestion to leverage browser caching.
But the problem is …
You can only apply browser caching to files that are hosted ON YOUR OWN server.
So if like most WordPress users, you’ve got tracking scripts for Google Analytics and Facebook Pixels on your website…
That limits your ability to get the best possible performance score for browser caching – and it is so frustrating.
But NOT if you use WP Rocket 😉
With WP Rocket you can now host the tracking scripts for Google Analytics and Facebook pixels yourself.
- Go to the Add-Ons tab
- Turn Google tracking status on
- Turn Facebook Pixel status on
And that’s it! You have now finished configuring the WP Rocket caching plugin for optimal website speed.
WP Rocket vs Other Caching Plugins
In my experience, WP Rocket outperforms all other caching plugins.
- It is easy to use
- It won’t break your site
- It has more features
The image below compares WP Rocket to other popular caching plugins including W3 Total Cache, WP Super Cache, and Hyper Cache.
See all the extra features you get with WP Rocket:

Before WP Rocket was released into the WordPress community, W3 Total Cache was the go-to plugin for website speed …
So I put both plugins to the test on identical websites to see which plugin performed the best. This is what happened: WP Rocket vs W3 Total Cache
I’ve not put WP Super Cache or Hyper Cache to the test yet. They are next.
WP Rocket Review: Conclusion
I hope you found this WP Rocket Review helpful.
If you’re looking for an easy way to make WordPress load faster, I highly recommend this WordPress caching plugin to you.
Not only is it easy to use, it has more features than all other WordPress caching plugins …
And WP Rocket also offers a 14 day money back guarantee if you’re not happy with the plugin for whatever reason.