How to Make a Website: Ultimate Beginner’s Guide

Do you want to make a website? Like anything new, creating a website for the first time can feel totally overwhelming. But don’t worry, it’s not as difficult as you might think. In fact, building a website is simple and fun when you know how.
You don’t need any technical experience or coding skills! Gone are the days of building web pages from scratch with HTML, CSS, and Javascript. Now, with the right tools, anyone can build a website without knowing how to code.
In this comprehensive guide, you will learn how to make a website, step by step. Just follow along with the tutorial and by the time you’ve finished, you will have your own website online.
Step 1: Choose a Website Platform
The very first step towards making a website is to choose a website platform to build a website with.
What is a Website Platform?
Simply put, a website platform which is also known as a website builder or a content management system (CMS) is a piece of software that allows you to make a website without any design, programming, or coding skills.
There are lots of website platforms to choose from, free and paid. Some popular choices include WordPress, Wix, Squarespace, and Joomla. However, knowing which one to choose is often confusing for beginners.
Which Is The Best Website Platform?
WordPress is the most popular website platform used by more than 42% of all website owners according to W3Techs.
To give you exact numbers, at the time of writing this guide, 28,183,568 of all websites on the internet are powered by WordPress reports BuiltWith.
So what is it that makes WordPress so popular?
Top 5 Reasons To Use WordPress
Below are just a few reasons why millions of website owners, including myself, have chosen to build a website with WordPress.
Note: when I say WordPress, I am talking about self-hosted WordPress at WordPress.org – not WordPress at WordPress.com.
1. You can build any type of website
The first thing that makes WordPress such a great platform is its versatility. You can build anything from business websites to a full-blown eCommerce store including blogs, portfolios, membership sites, forums, job boards, and more.
2. It is free and comes with no limitations
WordPress is free to use and it’s an open-source project so you can modify it in any way you want to. Also, with WordPress, you have full ownership of your website and all the content on it which is not the case with other website platforms like Wix, Squarespace, and WordPress.com. They can and will terminate your account without warning if they feel you are violating their terms of service, intentionally or not.
3. Customizing WordPress Is Easy
Making your website look just the way you want is easy. There are thousands of pre-made WordPress themes (templates) to choose from. Some are free and some are paid. There are templates for all types of websites (blogs, online stores, business sites, etc), many of which come with user-friendly settings to change colors, fonts, layouts, backgrounds, and more at the click of a button.
There are also thousands of free and paid WordPress plugins you can use to add almost any additional website functionality you need such as forms, galleries, analytics, eCommerce, sliders, and the list goes on.
4. Google loves WordPress
WordPress websites tend to rank higher in search results because by default WordPress is very SEO friendly. The platform is coded to follow best SEO practices and you can use SEO plugins like Rankmath to optimize your website even further.
5. WordPress help is everywhere
WordPress is backed by a supportive community of developers, designers, and bloggers, so help is never far away. You can find support for free in the WordPress forum here, in Facebook and LinkedIn groups, on Twitter, and there are countless how-to tutorials published by WordPress experts on YouTube and blogs like this one. With a quick Google search, you’ll soon find the help you are looking for.
Checkpoint
If like me and millions of other people you have chosen WordPress for your new website, you don’t need to go get it right now.
First, you need to:
- Choose a domain name and register it
- Get web hosting to host your site
- Add your domain name to your web host
WordPress is free to use, but you do need to pay for a domain name and a web hosting account. Web hosting is just $2.49 a month and you can get a domain name for less than $10 a year. Let’s continue.
Step 2: Get a Domain Name
To make a website with WordPress or any other platform, you need a domain name. A website cannot exist without one.
A domain name is a unique web address most commonly known as a URL that points to your website. For example, the domain name for this website is wpgiver.com
What Makes a Good Domain Name?
A good domain name is descriptive, short, memorable, and easy to spell without any numbers or special characters like dashes and underscores.
When building a website for business use, your domain name should match your business name like WPGiver (wpgiver.com). Or you can use your name instead if YOU are the business brand like Tony Robbins is at tonyrobbins.com.
For a personal website, it can be anything you want. Many people use their birth name or some shortened version of it.
Also, a good domain name ends in .com. It is the most popular and most recognized top-level domain (TLD) worldwide.
If the .com extension is already taken by someone else DO NOT buy .net, .org, .co, or any of the other less popular extensions available these days like .blog because you will lose traffic to the .com website since that’s the one people remember. And, you may run into trademark issues.
Find a Domain Name That’s Not Already Taken
If the domain name you want is already taken, try adding a stop word to it. For example, when I started my WordPress support business back in 2015, I wanted to name it Blog Mechanic. But the .com extension was already taken, so I added ‘the’ in front of it and thankfully TheBlogMechanic.com was available.
Other stop words you can try are ‘a’ ‘your’ ‘here’ ‘learn’ ‘about’. Get creative and experiment with different word combinations.
If you are unable to find an available domain name this way, the only other option is to go back to the drawing board and brainstorm new domain name ideas. Use Namecheap’s domain search feature to see if a domain name is available or not.
Once you’ve found a great domain name, it’s time to register it.
Where To Get a Domain Name
Although there are hundreds of places online where you can register a domain name, I have always used Namecheap. They are one of the cheapest online. You can get a .com domain name for just $5.98 and they have good customer support.
That said, some web hosting companies (more about web hosting in a minute) give you a free domain name for the first year. But I DO NOT recommend taking it.
Why?
For security reasons, you’ll want to keep your domain name and web hosting accounts separate. That way, if your website is ever hacked, the hacker cannot steal your domain name and vice versa. If someone gets into your domain name account, your web hosting won’t be affected. It’s also easier to change web hosting providers in the future should you wish to do so.
Let’s go ahead and register your domain name.
Click here to open up Namecheap in a new window. Enter your chosen domain name in the search bar and click the Search button.

On the next page, click the Add to Cart button. If the domain you want is already taken, try adding a stop word as I explained earlier.

You DO NOT need to purchase any of the upsell offers. Click the Checkout button.
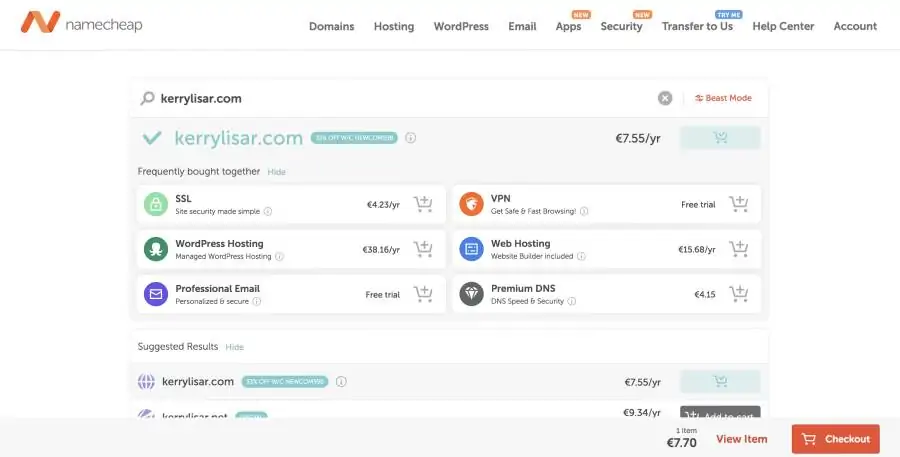
Turn on AUTO-RENEW. Again, you don’t need any of the upsell offers. Just make sure there are no typos in your domain name and click the Confirm Order button.

From here, things are self-explanatory. You’ll be asked to create a Namecheap account, fill out your account details and make payment.
And that’s it.
Now that you have a domain name, it’s time to get web hosting. Without it, your domain name won’t work.
Step 3: Get Web Hosting
Web hosting is like a digital filing cabinet. It’s where all your website files and database are stored. It’s where your website lives online.
Where To Get Web Hosting
Although I currently host my own website at a2Hosting, in this guide I am going to recommend Bluehost because they are equally as good, but they cost less. Bluehost is also the web host I mostly use when creating new websites for clients.
Of course, you can use either of them or another web host of your choice. But it will be easier for you to follow along with this guide if we are using the same tools.
Let’s go ahead and create a web hosting account at Bluehost.
Click here to open up Bluehost in a new window. Click the Get Started button.

On the next page, choose a hosting plan. The Basic Plan has everything you need to start with and you can always upgrade later when you need more resources.
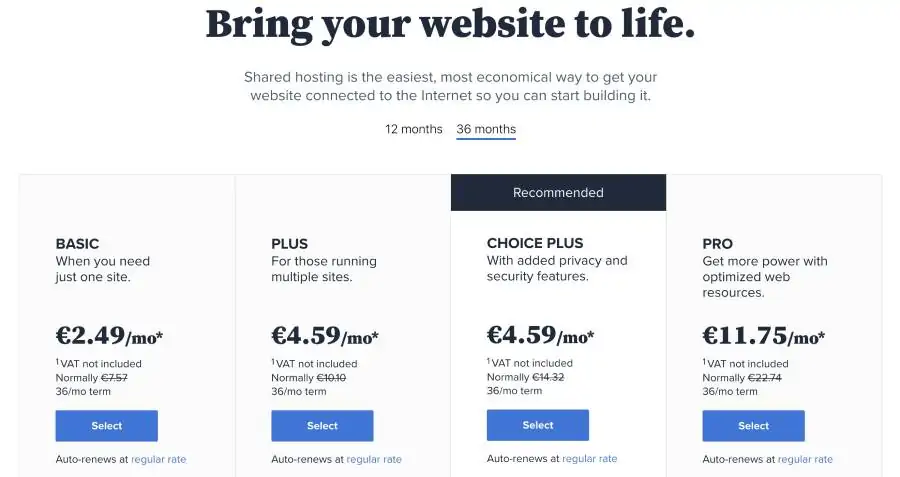
Bluehost will then ask you what domain name you want to use with your hosting account. Enter your registered domain name where it says ‘use a domain you own’ and click the Next button.
Next, you will be prompted to create an account. Enter your account information and on the same page …
You can change the billing cycle for your hosting plan, but if you do, be aware that the cost of hosting per month increases. You will also be offered some optional extras that you DO NOT need.

After that, choose your preferred payment method:

Agree to Bluehost’s terms of service and click the Submit button to complete checkout. Upon completion of payment, you will see a success message.

To finish setting up your account click the Create Your Account button. You will be asked to choose a password. Bluehost will then send you an email containing all your account information.
And that’s all.
Now that you have a web hosting account, the last step before you move on and make a website is to point your domain name to Bluehost.
Not using Namecheap? Updating domain name settings to point a domain name to a web host is the same for almost all popular domain name registrars. Search your registrar’s help section using keywords like ‘point domain name to web hosting’ to find step-by-step instructions.
Add Your Domain Name To Your Web Host
Login to your Namecheap account. You will see your registered domain name on the dashboard. To the right of it, click the Manage button.

In the ‘nameservers’ section, select Custom DNS and enter:
- ns1.bluehost.com
- ns2.bluehost.com
Then click the green tick to save your changes.

Not using Bluehost? you will find your nameserver information in the welcome email you received from your web hosting provider.
Once saved, it can take up to 48 hours for the changes to fully take effect, but it’s usually much sooner – less than an hour in my experience.
You’ll know when the domain name change is complete because when you visit your domain name, you will see a coming soon page like this:

When you see that page, you are ready to continue.
Step 4: Install WordPress
When you create a new account at Bluehost (and a2Hosting), they automatically install WordPress for you. So if you just signed up with one of them following the steps in this guide, click here to go to step 5.
If however, you already had an account at Bluehost or you are using a different web host and WordPress is NOT already installed on your domain name, there are a few different ways to install it. Choose the method that best suits your needs.
1. Manually Install WordPress on Bluehost
Login to Bluehost. Go to My Sites >> Add Site >> Create New Site.

Enter a site title and tagline. The tagline is optional, so if you don’t have one right now just leave it blank. Click the Next button.

Next, select your domain name. Leave the Directory blank. And uncheck the optional plugins, you don’t need them. In this guide, I am going to show you which plugins are essential for every website.
Click the Next button to continue.

Now, wait a few minutes while Bluehost installs WordPress for you. Upon completion, you will see a success message with your login information. Make a note of your username and password so you don’t get locked out of the website.

And that’s it. You have successfully installed WordPress on your Bluehost account. Click here to go to step 5.
2. Install WordPress Using Softaculous
Many popular web hosts make it easy for you to install WordPress using one-click software called Softaculous.
To get started, log in to your web hosting control panel area. In most cases, this will be at your domain name forward slash cpanel like this: wpgiver.com/cpanel – if you’re unsure contact your web host.

Once logged in, look for a section named Software or Autoinstallers. Click the Softaculous Apps Installer icon.

Under WordPress click the Install button.

Choose http://www as the protocol and select the domain name where you want WordPress installed. Leave the Directory blank.

Next, in the Site Settings section, enter a site name, site description, admin username, a memorable password, and an admin email address.
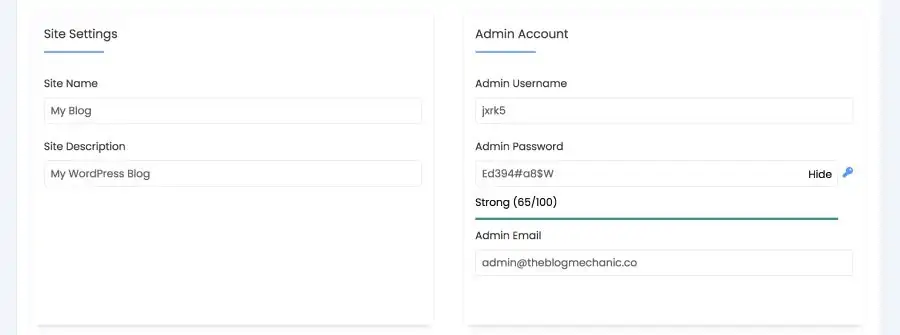
Lastly, Choose a Language and skip the select plugin(s) section. I am going to show you which plugins you need in this guide. Then, optionally enter an email address to have the installation details sent to you. Click the Install button.

Now just wait a few minutes while Softaculous installs WordPress.

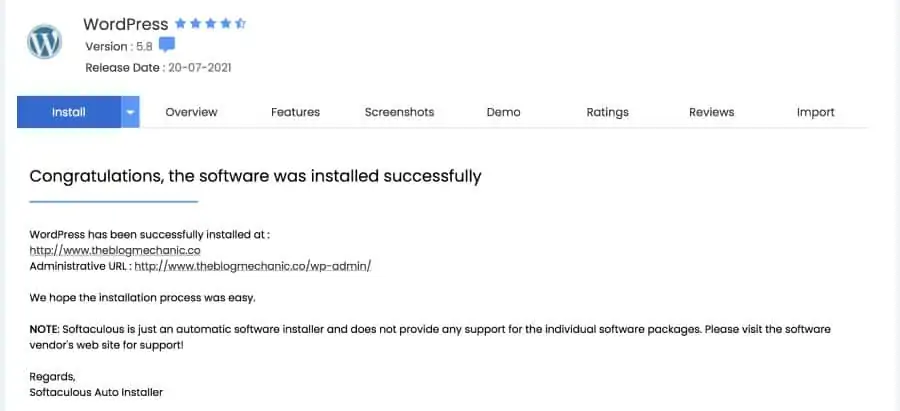
Upon completion, you’ll see a success message with links to your website and the admin area. Go to step 5 to continue.
3. Install WordPress Manually
In the unlikely event that your web hosting provider does not have any kind of one-click WordPress installation software (Softaculous, QuickInstall, Fantastico, etc), you will have to install WordPress manually using a file transfer Protocol (FTP) software.
To install WordPress via FTP you will first need to:
- Download FileZilla if you don’t already have it
- Create a new database for the website you are building
- Download the latest version of WordPress
- Upload WordPress and run the installer
I’ll be honest with you. When you’ve never done this before and you’re not a techie person, this process can feel intimidating but don’t worry, I’m going to walk you through it step by step. But first, a word of caution …
If your web host does not have an easy way to install WordPress, you should consider changing it because nowadays, all decent web hosts have one-click installers, and a good web host is crucial to the success of your website.
With that said, here’s how to install WordPress manually.
1. Download FileZilla
FileZilla is an FTP software that allows you to connect to your web hosting account and transfer files from your computer to the server, and you can use it on any operating system including Mac, Windows, and Linux. Follow these instructions to download and install FileZilla.
2. Create a Database
To create a database, log in to your web hosting control panel area. This is usually at your domain name followed by cpanel like this: wpgiver.com/cpanel

Once logged in, scroll down to the Databases section and click the MySQL Database Wizard icon.

Enter a database name of 5 or 6 characters. Click the Next Step button.
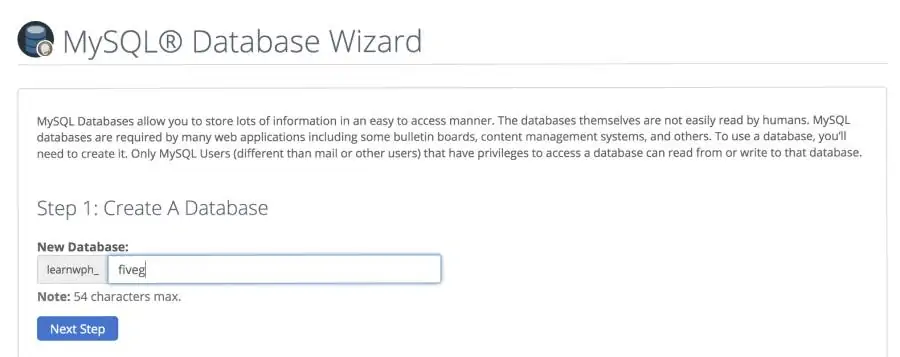
In the next step, enter a username. For simplicity, I use the same name as the database but you don’t have to, it can be anything you want …
Then click the Password Generator button to add a secure password, and make sure you copy and paste the password onto a notepad document.
Now click the Create User button to continue.

Important: Before you do anything else on the next screen, copy and paste the database name and username onto the notepad document with your password and save it! You need this information to run the WordPress installer.
Then, select All Privileges and click the Next Step button.

And that’s it. You’ll see a message letting you know the database is created.

Step 3. Download WordPress
Now you need to download the latest version of WordPress.

Go to https://wordpress.org/download and click the Download Button to download the zip file. Once downloaded, unzip it.
4. Upload WordPress
To upload WordPress, first, you need to open FileZilla and connect to your server using the FTP account credentials provided by your web host. If you’re unsure, contact your web host to find out what they are.

Now, on the Right Side of FileZilla, you need to navigate to the location where you want to install WordPress. This is known as the root of your domain name which for most people is inside the public_html folder. Double click the folder to open it.
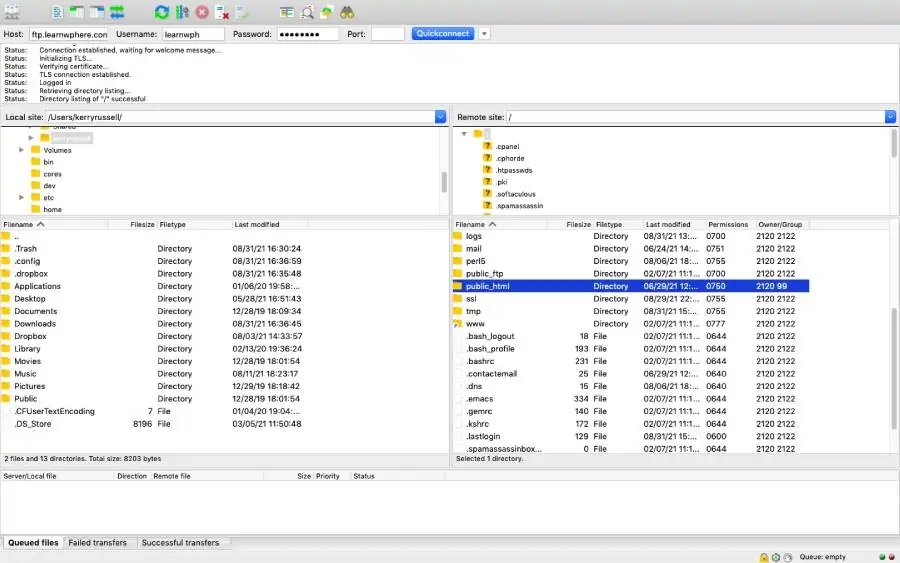
Note: when you have more than one domain name, you need to install WordPress inside a folder within public_html for example, the folder for WPGiver is named wpgiver.com – so if I used FTP I would go to public_html/wpgiver.com
Next, on the left side of FileZilla, you should see the WordPress folder you downloaded in the previous step. Double click it to open it up.
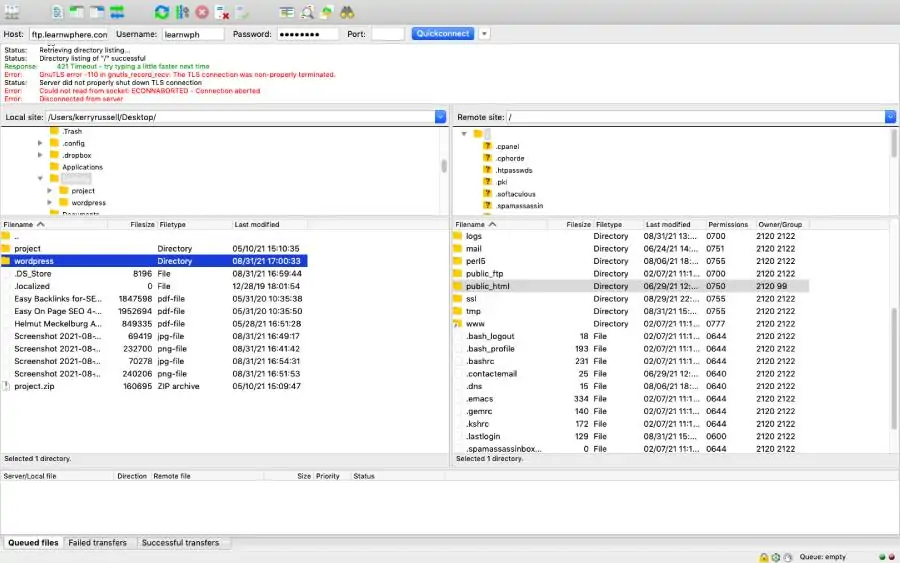
Now, click the ‘wp-admin’ folder once at the top of the list to select it. Then hold down the shift key on your keyboard and click the last file or folder in the list to select everything in between.
Once selected, drag and drop the highlighted files from the left to the right side of Filezilla to start the transfer.
When the files have finished transferring which takes about half an hour you are ready to move on to the final step.
5. Run The Installer
Remember that notepad document you saved the database details on?
Open it up.
Then visit your domain name in any browser and you will see step one of the installation process. Choose a language and click the Continue button to proceed.

On the next screen, you’ll see a message from WordPress basically telling you that you need your database details. Click the Let’s Go button.

Copy and paste your database name, username, and password into the relevant input fields. Leave Database Host as ‘localhost’ and click the Submit button.

WordPress will connect to your database and prompt you to run the installation. Click the Run the Installation button to continue.

Enter a site title, username, password, admin email address, and select the option to discourage Google and other search engines from indexing your website.
Why would you want to stop Google from indexing the site?
Because you don’t want it being found in search results before it’s ready. But don’t worry, I’ll remind you to uncheck that option before you launch.

Click the Install WordPress button and when the installation has finished, you will see a success message. Let’s continue.
Step 5: Add Must Have Plugins
As I mentioned earlier there are thousands (58,000+) of free and premium WordPress plugins that you can use to add additional functionality to your website.
But to keep things simple and focused, in this guide, we are only going to install the plugins that in my experience are essential.
The plugins I consider essential for every website are:
- UpdraftPlus – to create automated daily backups of your website and easily restore it at the click of a button
- Antispam Bee – to block spam comments and malicious trackbacks
- Wordfence Security – to protect your website against hacks and attacks
- GDPR Cookie Notice – to comply with GDPR, CCPA and other data privacy laws
- Ninja Forms – to add a contact form to your website
- WP Rocket – to optimize and keep your website fast. A free alternative is Hummingbird
- Smush – automatically optimizes images when you upload them to your website
- Rankmath – the best search engine optimization (SEO) plugin for WordPress
- MonsterInsights – to add Google Analytics to your website
- Beaver Builder – a drag and drop page builder to easily create custom pages and complex layouts without knowing how to code.
Most of the plugins listed above are free. UpdraftPlus and Beaver Builder have free and paid versions to choose from. I’ve also provided a free alternative for WP Rocket. However, if possible, use WP Rocket, it is the best site speed plugin ever created and will save you a ton of time and technical frustration.
How To Install Free Plugins
To install a free plugin, from the WordPress dashboard go to Plugins >> Add New. Search for the plugin name and it will show up in position one. Click the Install Now button, then click Activate.

How to Install Premium Plugins
When you buy a premium plugin, you will download the plugin zip file. To install it, go to Plugins >> Add New and click the Upload Plugin button.

Next, click the Browse button and select the plugin zip file to upload it. Once selected, click the Install Now button.

When the plugin is installed, you will see a success message. Click the Activate button.
For more detailed instructions on installing plugins see: how to install WordPress plugins.
Checkpoint
To make sure your website is set up the right way, it’s important to complete all the action steps above before you go any further.
By now you should have:
- Chosen a website platform which I’m guessing is WordPress since you’re still here following this guide.
- Found and registered a .com domain name that is easy to spell and remember. I recommend Namecheap.
- Created a web hosting account. I recommend Bluehost or a2Hosting, but you can use any reliable and trust
- Added your domain name to your web h
- Installed WordPress if it wasn’t automatically installed for you
- Added ‘must have’ plugins for essential website functionality.
Once you’ve completed ALL these steps, you are ready to continue. Next, I will show you how to get your website looking just the way you want it.
Step 5: Correctly Configure and Customize Your New Website
If you’ve come this far you now have a website, but it’s not finished yet. The free default theme added by WordPress is nothing to be desired, so you’ll definitely want to change it. And you have no core content.
Also, there are some important website settings that need to be properly configured. Let’s go do that now.
1. Configure WordPress Settings
To get started, log in to your WordPress website.
There are 6 different sections under the settings tab.

But in this guide, we are only going to focus on the Permalinks and Discussions tab because those two are important for security and SEO. When you have time, this article walks you through the other settings.
Permalink Settings
A permalink makes the URL of a page or post on your website look the way it does. For example, www.wpgiver.com/how-to-make-a-website
That’s the URL of the article you are reading now and straight away you know what the article is about before you even click it, right?
The problem is, by default, WordPress uses a permalink structure that looks like this: www.wpgiver.com/?p=123
Not only is it ugly and difficult for website visitors to easily remember and share with others, but most people also won’t trust a link like that because it looks spammy and gives no clue as to what’s on the other side.
Plus, search engines cannot understand what the content is about, which is bad for SEO.
The best permalink structure for both Google and humans is Post Name.

Discussions Settings
As the name suggests, the discussions tab is where you find all the settings for comments left by visitors on your website. Most of the settings are self-explanatory and can be configured to your liking, so I won’t go through them all.
The one setting you must uncheck though for security reasons is ‘allow link notification from other blogs (pingbacks and trackbacks) on new articles‘.

Hackers and spammers use pingbacks and trackbacks for malicious purposes, so you should uncheck that option and save your changes.
2. Secure Your Website With SSL
Adding an active SSL certificate to your website is one of the most effective ways to protect it and everyone who visits it from hackers.
SSL works by encrypting all data transferred between a web browser and the server where your site is hosted so no one can intercept or manipulate it. This includes passwords, payment information, email, or anything else that needs to be private on your website.
To check if SSL is active and configured properly on your website, in any browser, visit your website at http://www.yoursite.com.
If you are redirected to https://www.yoursite.com that means SSL is active and working and you can scroll down to the next step.
If you were NOT redirected, go to https://www.yoursite.com
Do you see a page that looks something like this?

On a new website, that means the certificate is installed and active, but it’s not set up properly. In which case, you should install the Really Simple SSL plugin to fix it.
Seeing a server not found message? A server not found message likely means there is no SSL certificate installed on your server and you need to contact your web host to install one for you.
3. Add a WordPress Theme
Now it’s time to make your new website look just the way you want it. You do this using a WordPress theme, free or premium.
WordPress themes are pre-made templates that make it easy for people with no design or coding skills to change the appearance of their website, and as I mentioned earlier, there are thousands of free and paid themes to choose from.
In fact, at the time of writing this guide, there are 8,714 free WordPress themes in the theme directory. My favorite ones are:
Note: The free themes above also offer premium features. If you chose to make a purchase after clicking a link, I may get a small commission at no additional cost to you. Thank you for supporting WPGiver. I use GeneratePress on this website.
How to Add a WordPress Theme
To add a new theme, log in to your website. Go to Appearance >> Themes and click Add New Theme

Next, if you know which theme you want to add, search for it by name. Or, use the links and filter feature to the left of search to find a theme that meets your needs.

To preview a theme, hover over it and click the Details & Preview link.
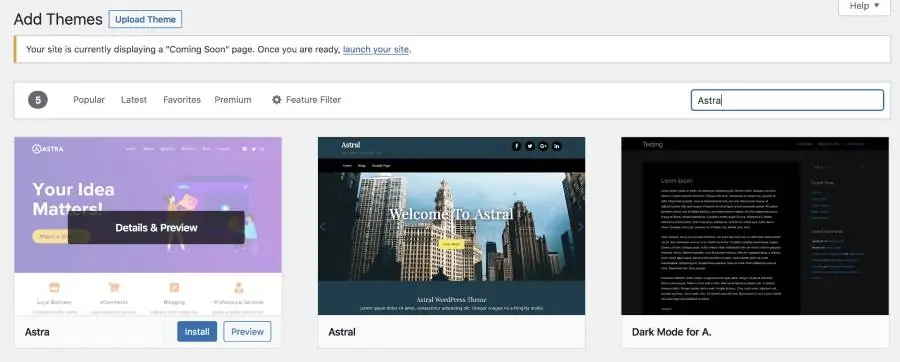
And if you like what you see, click the Install button. Once installed click Active to start using your chosen theme.
Did you purchase a premium theme?
The installation process is a little different! After purchase, you will download the theme zip file. Then, go to Appearance >> Themes and click the Upload button.

Now click the Upload Theme button followed by the Browse button and follow the prompts to install and activate the theme you purchased.

For a more detailed guide on adding a WordPress theme see my step-by-step tutorial: how to install a WordPress theme.
4. Add Essential Website Pages
Every website is different. But there are some core pages that every website needs, no matter what type of site it is or what topic you are writing about.
At a minimum, you should have a:
- homepage
- about page
- contact page
- privacy policy
- terms of use
And if you plan on making money with your website:
- an earnings disclaimer
Note: not every site needs a custom homepage right away. If you’re starting a blog, the homepage can simply be a list of all your blog posts to begin with.
How to Create Pages in WordPress
From the WordPress dashboard go to Pages >> Add New.

Then, add a page title. Add your content. Click the Publish button.

To add images and lists to the page, click the + icon in the top left corner (see image above) and search for ‘image’ or ‘lists’. Select the block you are searching for and it will be added to the page.
How to Change the Homepage
Some WordPress themes are configured to show blog posts on the front page and others use a static page. But you may have created your own homepage.
If you have, go to Appearance >> Customize

On the next screen select Homepage Settings. Check ‘a static page’ and choose the page you created. Click the Publish button.

5. Website Navigation
Navigation is important, it helps visitors find their way around your website. It also helps Google and other search engines understand what your site is about.
Most websites have at least two navigation menus: one in the header and one in the footer and I recommend your website does too.
As a general rule of thumb, the most important pages on your website (e.g. about, contact, services, products), should go in the header menu because that’s the first thing people see when arriving at your site.
The footer menu is best suited for pages that are less important but still needed such as legal pages (e.g. privacy policy and terms of use).
Now let’s go ahead and add the core pages you have created to the navigation menu of your website so visitors can easily find them.
How to Add a Navigation Menu
Go to Appearance >> Menus

Give the menu a name and click the Create Menu button. To keep things simple, I name my menus ‘header’ and ‘footer’ to avoid confusion.

Then, on the left side, select all the pages you want to add and click the Add to Menu button.

You can now drag and drop the menu items into your preferred order and check Primary Menu to add it to the header.
Click the Save Menu button and repeat the process for the footer menu.
6. Optional: Add an Online Store
If you’re building an online store, you will need to add eCommerce functionality to WordPress using a plugin called WooCommerce.
WooCommerce is the most popular eCommerce plugin and it’s free to use. It is compatible with any WordPress theme and integrates with popular payment gateways including PayPal and Stripe.
Also, you’re not limited to selling just physical products, you can sell digital products and services too. You can even use WooCommerce to turn your website into a membership site to earn recurring revenue.
7. Optional: Add a Blog
WordPress was originally created for the sole purpose of blogging, so if you want to add a blog to your website, all you have to do is:
- create a new page named blog
- go back to the homepage settings and set the Posts page
- add the blog page to the header navigation menu
We’ve already covered how to do each of these steps in this guide, so I won’t go through them again here.
Related: How to Start a WordPress Blog (that makes money!)
8. Optional: Add a Portfolio
If you’re building a website to showcase creative work, you’ll want to add a portfolio section. Portfolios are best showcased using a grid layout and there are tons of WordPress plugins that can help you accomplish this.
One of the best free portfolio plugins for startups and freelancers is Portfolio Gallery. But if that doesn’t meet your needs, this list post by Kinsta has some great recommendations and tips on what to look for in a WordPress portfolio plugin.
Before Launching Your New Website
Congratulations! Your new website is ready, but before you go ahead and launch, I encourage you to go back through this guide to make sure you have completed ALL the steps.
Most importantly, your website should be secured with SSL and take some time to check that there are no spelling mistakes or broken links.
If everything looks good, don’t forget to change the search engine settings to let Google and other search engines know that the site is ready to be found on the internet. You can do that by going to Settings >> Reading
When you’re ready, log in to your Bluehost account. Go to the My Settings tab and click the Manage Site button.

On the next page go to the Settings tab and turn off the Coming Soon page to launch your website.

Finally, go visit your website in a few different popular browsers and on mobile and tablet too to make sure it looks good on any browser, screen size, and device.
I hope you enjoyed this guide on how to make a website. If you have any questions, leave a comment below, I’m here to help.
