How To Change Font In WordPress (+ Font Size & Color)

Do you want to change the font on your WordPress site?
In this tutorial, I will show you how to change font in WordPress, step by step. Including font size and font color.
Like all things WordPress, there are a few different ways to do it. You can use:
- a plugin
- the WordPress editor
- the theme customizer
- CSS code
Where possible, CSS is my recommended method. But not everyone is comfortable with code. So I will show you all the different ways to change the font on WordPress and you can choose the method you’re most comfortable with.
Let’s get started.
How to Change Font in WordPress
If you’re not comfortable with CSS, the easiest way to change font on WordPress is with a plugin.
Change the Font With a Plugin
Although there are several font plugins you can use, I’m going to recommend Google Fonts Typography because in my experience, it’s the best one

The plugin comes with over 900 free Google fonts to choose from.
It’s compatible with all WordPress themes.
And you can see how fonts look on your site before adding them.
Through the basic settings you can change fonts globally. Or you can use the advanced settings to change specific fonts in specific theme areas.
What I like most about this plugin is: unlike Easy Google Fonts, which is another popular WordPress font plugin …
No matter what theme you’re using, you can easily change the font in most areas of your site WITHOUT having basic CSS knowledge – making this plugin a perfect solution for non-techie users.
To get started, install and activate the plugin. For more details, see my guide on how to install a WordPress plugin.
Once activated, go to Appearance >> Customize.
The plugin will add a new Google Fonts option to the top of the theme customizer panel. Click on it to open it up and configure as follows:

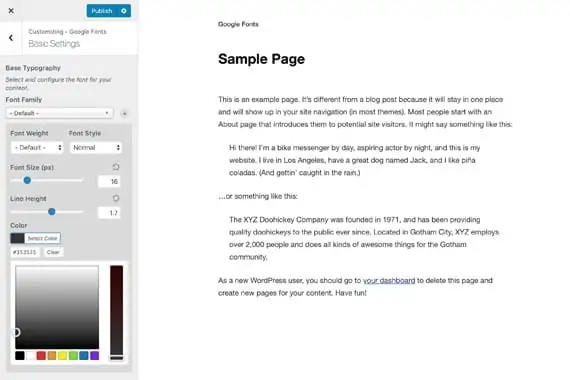
Step 1: Basic Settings
This is where you can change the font in WordPress globally. Choose a big bold font that stands out for headings and a less distinctive, complementary font for body text, buttons and inputs – like I have done in the screenshot below.

Changing fonts is easy. Just open up the drop down menus and select the fonts you want to use. Once selected, on the right side of the screen, you can see how your chosen fonts look before publishing your changes.
Note: If you don’t know which fonts to use just yet, rather than previewing all 870 fonts one by one, which will of course take you forever ….
I recommend going to the official Google Fonts website where you can easily browse and find fonts. And that you follow these guidelines to help you choose the best Google fonts for your WordPress theme.
Then, if you need help mixing and matching font combinations, see the ‘featured font pairs’ at www.FontPair.co

Once you’ve found a font pair that you like, add it to the Google Fonts Typography plugin. And if you like what you see, Click Publish.
Step 2: Advanced Settings
In the advanced settings you can change the font in specific theme areas including the site title and description, navigation menus, sidebar content, footer content, post and page content, and headings 1 to 6.

In most cases, depending on the WordPress theme you’re using and your design goals, it’s likely that here you’ll only need to change the Navigation Menu font to match the body text font you added to the basic settings, in the previous step.
Note: using too many fonts will slow your site down. This is why I recommend choosing two fonts only – one for headings and one for body text.
Step 3: Unlock More Features
With the pro version of the plugin, you can also change the font size, font color, font weight and line height. And, for a faster loading site, you can choose to only load font styles that you need – increasing load time by 400%.
Do you need all the additional features offered in the Pro version?
No. But for non-techie users who want to change size, weight, or color of fonts, and optimize them for a faster loading website, upgrading to the paid version will save you a lot of time.
Other WordPress Font Plugins
Chances are, with the Google Fonts Typography plugin, you will be able to easily change all the fonts you want to change on your WordPress site.
But if for some reason, the plugin does not meet your needs, or in the unlikely event that it doesn’t work with your theme, below is a list of other WordPress font plugins you might want to try.
Easy Google Fonts

Installed on more than 300,000 websites worldwide, Easy Google Fonts is a popular plugin. It works with any WordPress theme, and has 600+ Google fonts to choose from. And you can preview fonts before publishing them.
The upside of using this plugin is: unlike Google Fonts Typography, with the free version, you can change the text size and font color, as well as font family.
The downside is: to be able to change fonts not included in the plugins default options which are usually determined by your theme, you will need to have basic CSS knowledge – so non techie users will most likely struggle to use this plugin.
WP Google Fonts

This plugin is a tiny bit easier to use than Easy Google Fonts. You select a font type and weight, and then choose from a list of default css selectors to apply the font to. Including all body tags, headings 1 to 6, paragraphs, lists, and backquotes. The plugin then adds the necessary code to your site.
But still, if you want to change font in a specific theme area that’s not included in the default settings, you’ll need basic css knowledge. And, with this plugin, you cannot preview fonts before adding them to your site.
Change the Font with CSS
The first step towards changing fonts in WordPress with code is to choose the font you want to use from the Google Fonts Library. But first …

If you’re new to mixing and matching fonts, go to FontPair. It helps you quickly pair fonts together.
Browse the recommended fonts and choose a font pair that you like. Then, go to the Google Fonts Library.
Enter the name of your headline font into the search bar in the top left corner of the screen, as seen in the image below. Click the Red Cross to select it. And do the same to add your body font.

Next, in the bottom right corner of the screen, you will see an expandable box. This is where you’ll find the necessary code for your new fonts. To open the box up click the Minus Icon and go to the Customize tab.

On the Customize tab, you will see the fonts you have added along with a list of font styles for each one.
Select the font styles you intend to use. In most cases, that’ll be 400 for body text, and 700 or 900 for your headline text.
Once selected, Click Embed.

Now all that’s left to do is add the embed code and css selectors to your WordPress website. Let’s go do that!
Adding Google Fonts to WordPress
To add Google Fonts to WordPress, you need to copy the standard embed code and paste it in the <head> tag of your site.
Note: some WordPress themes like Genesis have settings where you can add header and footer code, but many do not. So …
To keep things simple, I will show you how to add the code using a plugin called Insert Headers and Footers.
To get started, install and activate the plugin. Then go to Settings >> Insert Headers and Footers.
On the next page, paste the embed code from Google Fonts into the Scripts in Header section as seen in the image below. Then, save your font changes.

And that’s it! You’ve added Google Fonts to WordPress. Once you have done that you can start using the provided CSS rules to style fonts on your site. Keep reading to learn how to do that.
Styling Fonts With CSS
In the screenshot below, you can see the CSS rules for the fonts I have chosen to use in this tutorial.

Your CSS rules will likely be different from mine unless you’ve chosen to use the same font. So …
As you follow along with the steps below, remember to replace my CSS rules with your own, okay?
Login to your WordPress site. Go to Appearance >> Customize >> Additional CSS. This is where you need to add the CSS selectors and rules to start using the new fonts we’ve just added to your site.

To change the body font, add this code and click the publish button:
body {
 font-family: 'Merriweather', serif;
}
To change headline font, add this code and click the publish button:
As you’re doing this don’t forget to replace my CSS rule with your own.
Note: depending on your WordPress theme, not all fonts on your site will have changed, but most of it should have. Continue and I’ll show you how to fix that.
Once you’ve added the codes above and saved your font changes, view your site and make a note of any fonts that have NOT changed.
Now watch the video below where I show you how to change those fonts too.
Note: however you choose to change font, the change is applied to your theme, not WordPress. You will lose your changes if you switch themes.
How To Change Font Size in WordPress
Now that you know how to change the font style, I’ll show you how to change font size in WordPress.
There are three different ways you can do this – using a plugin, the WordPress editor, or CSS code.
CSS code is the best way because changes are applied to your site globally, not on a page by page or post by post basis. So you can set it and forget it.
But no matter which method you use, font size is changed on your WordPress theme, not WordPress. If you switch themes, you will lose your changes.
Changing Font Size With a Plugin
To change font size of your font with a plugin, we will use TinyMCE Advanced. It works with the Classic Editor and Gutenberg.
The first thing you need to do is Install and activate the plugin. If needed, see my step by step guide: How to install a WordPress plugin.
Once activated, go to Settings >> TinyMCE Advanced. On the settings page, you will see two tabs. One for Gutenberg and one for the Classic editor.

Scroll down to the Toolbar Settings and drag and drop the Font Sizes Button from the bottom toolbar to the top toolbar.
Next, switch to the Classic tab and do the same. Then, Save Your Changes.

Now when you create a new post or edit an existing one, the default WordPress editor will be replaced with the TinyMCE Editor where you can use the font sizes button to change font size on individual pages and posts.

The image above is how the editor looks on Gutenberg. The Classic editor looks slightly different. But you get the idea, right?
Changing Font Size Using Gutenberg
With the Gutenberg Editor you can increase or decrease font size within each text block.
Select the block of text you want to edit and then to the right of the screen in the Block Menu, click on the Text Setting Tab and make your selection as seen in the screenshot below.

If none of the options result in the font size you want, you can enter a number instead. In this example, I have set the font to 20px.
Note: The Gutenberg editor is limited and generally, it’s not a method I recommend because you can only change the size of paragraph text. For more flexibility, you’ll need to install the TinyMCE Advanced plugin, or even better, use CSS instead.
Change Font Size in The Classic Editor
Sorry, it’s not possible to change font size in the Classic editor. You’ll need to use the TinyMCE Plugin, or CSS.
Change Font Size in WordPress With CSS
If you want to change font size globally, using css is the best way to do it.
Go to Appearance >> Customize >> Additional CSS. This is where you will add the code to change font size. For example …
To make all paragraph text on your site bigger, in every location including the header, sidebar and footer, assuming the text is not already 20px or greater, you would add this code:
p {
 font-size: 20px;
}
But if you wanted to change paragraph text on ALL pages and post only, you’ll need to add more specific CSS, like this:
.entry-content p {
  font-size: 20px;
}
Note: each theme is different, so the CSS selector for pages and posts on your site may be different to mine. To find the CSS selector for YOUR pages and posts, you can use the inspect tool in FireFox and Chrome browsers.
Here’s another example: when changing the font size of h1 text, you add this.
h1 {
font-size: 2.5rem;
}
Note: Notice how I’ve used rem to set the font size for headings and not px like I did for paragraphs.
We use rem or em for title font so the size is relative to body text. If you want to know why read this article.
And if you’re ever unsure which one to use (px, rem, em) for a specific font on your website, use the inspect tool to see which one your theme is already using and just use that.
How to Change Font Color In WordPress
So far I have shown you how to change font family and font size in WordPress. Now, I’ll show you how to change font color in WordPress.
Just like font family and font size, there’s a few different ways to do this. You can change font color globally via the theme Customizer or use CSS.
And you can change specific font colors on specific pages and posts only using the Gutenberg or the Classic editor.
Changing Font Color In The Theme Customizer
Note: Depending on the theme you’re using, this method may not be an option for you. If it’s not you can jump to the next section.
Go to Appearance, click Customize, then Colors. The options you will see on the next page will vary from theme to theme.

As you can see in the screenshot above, the theme I’m using for this tutorial allows me to change the color of links, main text, and secondary text. But it doesn’t let me target specific fonts like the site title and widget headlines.
If your theme doesn’t support this method, or the options available in the customizer are not enough for what you need, you’ll need to use CSS instead which is coming up next.
Changing Font Color Globally With CSS
Go to Appearance, click Customize, then Additional CSS. This is where you will add CSS code to change specific font colors globally.
For example, if you wanted to change the color of headings 1 through 6, you would enter something like this:
h1, h2, h3, h4, h5, h6 {
  color: #1F618D;
}
Note: depending on the theme you’re using, it’s likely that the code above will only be applied to headings within pages and posts – and not the actual ‘post title’ seen on single post pages and blog archive pages.
To fix this, you’ll need to add more specific CSS. For example, in my theme, to change the color of post titles seen on the blog archive page, I need to add:
.entry-title a {
   color: #1F618D;
}
And to change the color of post titles on single post pages, I need to add this:
h1.entry-title {
   color: #1F618D;
}
To find the CSS selector of your headline fonts you can use the inspect tool on FireFox and Chrome browsers. Read this article to learn how. And …
If you don’t know the code (called a hex code) of the color you want to use for fonts on your site, use this color chart to find it.
Changing Font Color In The Gutenberg Editor
In the Gutenberg Editor you can change font color for individual text blocks. To do this, click on the text block you want to edit, and go to Color Settings in the Block Menu to the right of the screen.

Note: with the Gutenberg editor, you can only change the color of paragraph text – not headlines. And, you cannot change the color of specific words within a text block either. To do this you’ll need to install the TinyMCE Plugin.
Once installed, a new section called Text Color will be added to the Gutenberg editor in the Block Menu where you can change font color of headings and selected text.
Changing Font Color In The Classic Editor
Changing font color with the Classic editor is easy. You can change headlines, an entire block of text, or just a few specific words. In the example below, I have changed selected text to Blue.

As seen in the screenshot above, you highlight the text you want to edit, click the Font Color Button in the toolbar, choose a color or add a new one, and save your changes.
Frequently Asked Questions
Can you change font color on WordPress?
Yes, you can easily change font color on WordPress by using the theme customizer. In the WordPress dashboard go to Appearance, click Customize, then Additional CSS and add the code provided in this post. After that, change the hex code number to your desired color.
How do I use Google Fonts in WordPress?
- Go to Plugins >> Add new
- In the search box, enter Google Fonts Typography
- It will be the first plugin in the results. Intall now and activate.
- Go to Appearance > Customize > Google Fonts
How do I change the color of links in WordPress?
You can change the color of hyperlinks with Custom CSS. From the dashboard go to Appearance > Customise > Additional CSS and add this code: a {color: #0000EE;}. Note: change the hex code to your desired color.
How many different fonts should you use on a website?
It’s best to keep the number of used fonts to a minimum. Too many fonts make a website look unprofessional and hard to read. I recommend 2 to 3 fonts only.
Conclusion
I hope this article has made changing the font on your WordPress website easy for you – font type – size – and color.
You have learned how to change font type, font size, and font color in a number of different ways. Use the method that best suits you.
If you have basic CSS knowledge, that’s my recommended method. But if you’re not comfortable with code …
The easiest way to change fonts in WordPress is with the Google Fonts Typography plugin.